This topic came up recently in one of my classes. I feel like there is more interest in this especially since I have read more about the topic lately (this year) and I seem to be getting more spammy calls on my cell phone personally.

Thursday, October 11, 2018
Friday, August 17, 2018
How To Scan A Document Using Your Cell Phone
Created by Jerry Matson 8/17/18
There are times when you need to save a document or make a copy, either to put in your files or send to someone. Many of us have printers at home that have a copy function (print/copy/fax machines). But sometimes we are not at home, or it can be a hassle to load the document and go thru all the menus to open and app and save it somewhere. And sometimes we are working with someone over the phone and we would like to have a copy of some document that THEY have. How convenient would it be to save it as a PDF and just email it?!
Of course, the simplest and quickest thing to do would be to just take a picture of it with our cell phones and send the pic. But the disadvantage of that is that it will get saved in your hundreds of other photos and eventually lost.
One advantage of saving as a PDF is that the document can be “OCR’d” (optical character recognition) so the text can be searchable in the future.
Tools / Apps
There are many different ways or tools or apps to use your cell phone to save a PDF. If you look in the Apple iTunes or the Google Play Store you will find dozens of apps. There may be some advantages to some of them if you use them a lot but I prefer to try to keep things simple and not get too many different apps.
If you have a Google account (Gmail, etc.) you already have access to a great tool. It is built into the Google Drive app that manages all your documents in the Google cloud-based file storage app called “Drive” or “MyDrive”.
(Note: the rest of this post assumes you have a Google account and use Gmail. If you don’t you are missing some of the best technology available and it’s all for free!)
Get the Drive App
To get started make sure you have the Drive app installed on your phone. For iPhones you go to the iTunes store and search for “Google Drive”. For Android phones go to the Google Play Store. Look for the app with the 3-color triangle icon to make sure it is the right one.
Once that is installed you will have access to your online file storage. With Google and Gmail you get 15 gigabytes of free storage for all your files and photos.
This is what it looks like in the Google Play Store:

(Notice it has been downloaded over a BILLION times!)
After you install and open it you will see some of your documents listed there if you have used it before on other devices (laptop, desktop, or some other place). If you have not then your screen will probably be blank. The app may prompt you to allow some permissions and show you a few information screens.
What’s nice about this app and Google Drive in general is that you can save files there and access them from any other device you have, or any other location that you log into. And will billions of people, companies, and corporations using it you can feel safe that you stuff will be secure. That primarily depends are how secure your password is!
How To Scan A Document
So now you have the app installed. Here is what it looks like for one of my accounts.
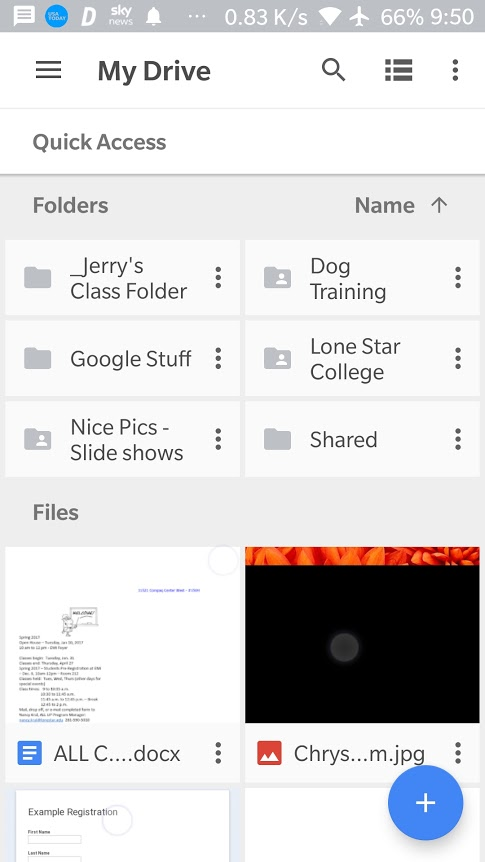
It shows folders at the top and some documents listed below. If you are not familiar I will leave it to you to explore and learn about. Our purpose now is to scan a document and put it there.
Notice the blue circle with the plus sign in the lower right corner. That is where you can create new documents (word docs, spreadsheets, or slide presentations). If you touch it to open you will see the following choices pop up.

The choice we are interested in is the “Scan” option. If you touch that you will see the camera open up with a live view to take a photo. But it’s not just a photo - it is a document scanner.
So you want to place a document that you want to scan on a surface with a contrasting background. The app needs some contrast to define the edges of the document. If it is a white piece of paper on a light background it can’t tell where the document begins or ends.
There is also a bit of technique to it and you should try a few times to get used to using it. For example, if you hold the phone directly over the document sometimes the sensors in the phone will think you have rotated it and the photo of your document will be upside down. The technique is to hold your phone over the document but keep it at a shallow angle. This will produce an image with a “keystone” shape but the software expects that and will automatically correct it.
Here is a view of a sample document that I have place on a red rubbermaid lid.

And here is the photo that it took:

Notice that the app has corrected the color and the shape. Amazing! Now it gives you 3 options at the bottom. On the left the plus sign means “take another pic of another page and add it to the current file.” That is useful if you have several pages and want them all to be in the same PDF file. The center icon (the little circle with an arrow) means retake the photo again (in case it is out of focus or you didn’t center it right or whatever). And the checkmark on the right means save it now.
After you save it you will see a new document with title of “scanned_yyyymmdd-hhmm.pdf”. That is the date and time that you scanned it. You really should give it a proper name now or all your various scans will become jumbled and you won’t know which is what.
So touch the little 3 dot menu on the right and the following menu screen will pop up. Actually, to see these choices you need to scroll down a little bit. What you are looking for now is the ‘rename’ option. Touch that and overwrite the ‘scanned’ part and give it a descriptive name. I like to keep the date in the filename so I know when I created it.

Now, after you have given it a proper name, you can open this menu again and see if you want to move the PDF to another folder, print it, download it, or most likely ‘send a copy’ to someone. Or another way to do that is to then flip to your Gmail account, create a new email, then attach this new PDF to that email and send it that way.
So there you have it. Very useful! If you do that a few times you will see how quick and easy it is!
Finally, another tip. Remember that this is a PDF document now, not just a photo. And Google will “OCR” the document so the text inside is searchable. That means after you create a lot of documents (of all types) you can type into the search bar at the top a few keywords and Google will search all of your documents including all your PDFs! Very powerful!
I have scanned store receipts, product information manuals, info sheets in stores on products I might want to buy, medical records and EOBs, car registrations, insurance, titles, and many, many more. I have many hundreds of documents in my Drive!
I hope you find this as useful as I have over the years!
References:
What Is Google Drive? - www.lifewire.com/google-drive-4165788
What is Google Drive and How Does It Work? https://www.youtube.com/watch?v=WWUiput7F1w
Scan documents with Google Drive - https://support.google.com/drive/answer/3145835?hl=en&co=GENIE.Platform%3DAndroid
How to Scan Documents to Your Phone or Tablet - https://www.lifewire.com/how-to-scan-documents-to-your-phone-or-tablet-4155329
Friday, January 5, 2018
Why You Should Use A Password Manager
Here is why you should use a password manager:
- Your passwords are too simple and too short.
- You reuse your passwords in too many places.
- Your system of writing them down is risky.
- Your system isn't convenient enough so you use shortcuts.
Monday, December 4, 2017
How to use keyboard tags and keys
How to create keyboard keys effects
This blog post describes how to insert some code into your blogger theme, then use tags to make text appear like key images.
https://helplogger.blogspot.com/2013/10/css-keyboard-keys-on-blogger.html
Here is a test post using keyboard key tags. Ctrl + F
This blog post describes how to insert some code into your blogger theme, then use tags to make text appear like key images.
https://helplogger.blogspot.com/2013/10/css-keyboard-keys-on-blogger.html
Here is a test post using keyboard key tags. Ctrl + F
Sunday, December 3, 2017
Gmail - How To Make Gmail Look More Like Outlook
Gmail has a lot of wonderful features and customizations but many of us have used Microsoft Outlook for many years (decades!) and for some people that it is difficult to change.
If you want to use Gmail for all its advantages but you miss the look and layout of Outlook there is a way for you to change Gmail to a split view.
How To Create A Hyperlink - Link to a URL or Google Document
There is a better way to share your documents and files by email than by sending an attachment. The better way is to put your documents and files in the cloud and just share them with a link. The 'cloud' could be Google Drive, Dropbox, Microsoft OneDrive and others.
Thank goodness we have cloud computing these days to make it easier and better for everyone. BUT, it’s hard to break old habits, and you need to have a good concept, or mental model, of what is different.
Thank goodness we have cloud computing these days to make it easier and better for everyone. BUT, it’s hard to break old habits, and you need to have a good concept, or mental model, of what is different.
So here are a few things to think about.
If you send a document (Word or Excel files) as a FILE attachment, then your people will have a copy that will never change. If you ever update the document you will have to send the updated version to them again. And there are multiple copies everywhere. If you send an attachment to 10 people there are 11 copies of it (including yours).
BUT, if you send the document as a LINK to your Google Docs document (or Dropbox or whatever) then they will always go to your shared file and see the most current version. There is only one and it is always updated.
Saturday, November 25, 2017
Gmail - My recommended basic settings
Many people use Gmail and never change anything, and possibly wonder what is the big deal about Gmail. Why is it so popular when it looks and feels like every other email program?
My series on Gmail will try to show you how to get the most of out your Gmail account. You can be as simple or complex as you want. My general instructional style is to 'crawl, walk, then run' so just start with the basics.
The basic Gmail interface is pretty plain. Here are a few of my recommended settings to improve things a little.
To start, find the settings button in the upper right corner. For Gmail it is the little gear icon. When the drop-down menu appears click on 'settings'. Then a whole new page will open.

Across the top you will see many different tabs, or pages, of settings: General, Labels, Inbox, etc. Let's focus on just the General tab first.
I won't go into each setting on this page, just the basic ones to get you started.
Looking down the list the first setting I would change is the "conversation view," which by default is off. If you change this to 'on' then multiple emails with the same subject will be shown as one email line instead of many separate emails. This reduces confusion and allows you to follow an email discussion much easier.
The next setting I would change is "keyboard shortcuts": change it to 'on'. This doesn't change the appearance in any way but allows you to use certain keyboard keystrokes for faster and easier actions. For example, shift-C opens a new email in a separate pop-up window. Pressing G then I refreshes and resets the Inbox view. There are more but that will be in a future post.
Next, change the "Button Labels" to 'text.' This changes the icons at the top to text, which is much easier to read.
You can add a picture if you want. Kinda nice if you want to take the time, but totally optional.
The signature is also optional but I like to sign my name to most emails so I just add a blank line or two and then put my first name. You can get quite fancy with signatures, adding formatting text and even icons or graphics. If you do add a signature ensure you also check the little box at the bottom: "Insert this signature before quoted text in replies and remove the "--" line that precedes it." If you don't check that box then your signature will appear below any quoted reply text, which can be confusing to people if it is long.
Next, turn the "Personal level indicators" to 'off.' These are little arrow icons in the Inbox. They are of little value and only serve to clutter the appearance, IMHO. I like as clean and simple a view as I can get, so these have to go.
That's it for this page. Now the most important part is to make sure you click on the tiny little 'save' button at the very bottom. It is so small it's like they are trying to hide it.
But we are not quite done yet! Click on the settings again (the little gear icon) and then 'Settings.' When the settings page opens click on the "Inbox" tab at the top (third from the left).
Again, I like to keep my inbox display as clean and simple as I can, so scroll down and "Importance Markers" and click on 'No Markers." Now click on save changes again.
Now you will notice that 2 columns of icons are gone, leaving a simpler display. You will still see the column of stars but they can be useful and I will mention them in a future post.

There is one last setting that is optional but may be important for some people. If you are used to using Microsoft Outlook you may want your email display to look more like that. You can experiment with this and see if you like it. Once again, click on the settings icon and select "Settings." Then look to the right side and click on the "Labs" tab.
There are many interesting things to look at here but you want to scroll down and find the "Preview Pane" and enable that. Again, scroll all the way down and click on the 'Save' button.
Now you will see a new icon in the upper right corner, just to the left of the settings gear icon. If you hover your cursor over it a pop-up will display "Toggle Split Pane Mode." Click on it and select "vertical split" and the display will change. Now click on any email and you will see it open in the right pane - just like Outlook. To turn it off just click again and select "no split."
So those are the basic settings that I like in setting up my Gmail account. There are many more functions and changes but I will cover them in the future.
Hope you find this useful!
My series on Gmail will try to show you how to get the most of out your Gmail account. You can be as simple or complex as you want. My general instructional style is to 'crawl, walk, then run' so just start with the basics.
The basic Gmail interface is pretty plain. Here are a few of my recommended settings to improve things a little.
To start, find the settings button in the upper right corner. For Gmail it is the little gear icon. When the drop-down menu appears click on 'settings'. Then a whole new page will open.

Across the top you will see many different tabs, or pages, of settings: General, Labels, Inbox, etc. Let's focus on just the General tab first.
I won't go into each setting on this page, just the basic ones to get you started.
Looking down the list the first setting I would change is the "conversation view," which by default is off. If you change this to 'on' then multiple emails with the same subject will be shown as one email line instead of many separate emails. This reduces confusion and allows you to follow an email discussion much easier.
The next setting I would change is "keyboard shortcuts": change it to 'on'. This doesn't change the appearance in any way but allows you to use certain keyboard keystrokes for faster and easier actions. For example, shift-C opens a new email in a separate pop-up window. Pressing G then I refreshes and resets the Inbox view. There are more but that will be in a future post.
Next, change the "Button Labels" to 'text.' This changes the icons at the top to text, which is much easier to read.
You can add a picture if you want. Kinda nice if you want to take the time, but totally optional.
The signature is also optional but I like to sign my name to most emails so I just add a blank line or two and then put my first name. You can get quite fancy with signatures, adding formatting text and even icons or graphics. If you do add a signature ensure you also check the little box at the bottom: "Insert this signature before quoted text in replies and remove the "--" line that precedes it." If you don't check that box then your signature will appear below any quoted reply text, which can be confusing to people if it is long.
Next, turn the "Personal level indicators" to 'off.' These are little arrow icons in the Inbox. They are of little value and only serve to clutter the appearance, IMHO. I like as clean and simple a view as I can get, so these have to go.
That's it for this page. Now the most important part is to make sure you click on the tiny little 'save' button at the very bottom. It is so small it's like they are trying to hide it.
But we are not quite done yet! Click on the settings again (the little gear icon) and then 'Settings.' When the settings page opens click on the "Inbox" tab at the top (third from the left).
Again, I like to keep my inbox display as clean and simple as I can, so scroll down and "Importance Markers" and click on 'No Markers." Now click on save changes again.
Now you will notice that 2 columns of icons are gone, leaving a simpler display. You will still see the column of stars but they can be useful and I will mention them in a future post.
 |
| After |

Before
There is one last setting that is optional but may be important for some people. If you are used to using Microsoft Outlook you may want your email display to look more like that. You can experiment with this and see if you like it. Once again, click on the settings icon and select "Settings." Then look to the right side and click on the "Labs" tab.
There are many interesting things to look at here but you want to scroll down and find the "Preview Pane" and enable that. Again, scroll all the way down and click on the 'Save' button.
Now you will see a new icon in the upper right corner, just to the left of the settings gear icon. If you hover your cursor over it a pop-up will display "Toggle Split Pane Mode." Click on it and select "vertical split" and the display will change. Now click on any email and you will see it open in the right pane - just like Outlook. To turn it off just click again and select "no split."
So those are the basic settings that I like in setting up my Gmail account. There are many more functions and changes but I will cover them in the future.
Hope you find this useful!
Subscribe to:
Posts (Atom)